FAQ: SignAnything
Before you begin
-
Make sure you've created your SignAnything document. Once you're set, follow along!
-
This is only available if your signer is signing remotely
-
Any text box you tick “ request client fill in” will be mandatory for the first signer to complete before they can proceed to signing
Step-by-Step Guide
-
Navigate to the CUSTOM OPTIONS section and select the text box icon.

2. Locate the desired placement for your text box by clicking directly on the PDF.
3. If you wish for the signer to complete specific sections of the document, be sure to check the box labeled "Request client fill in." This ensures that they must fill out those sections before proceeding with the signing process.

What if I want to add a little note for the signer when completing the fill in request like “enter your legal name”
Simply rename the text box with the instructions


It will show the signer the message you had renamed

What if I already have the details and just want them to review the information before signing
Rename the text box to “Please review your details”

and add the details to the text box

The signer will see the “please review” and the text you had enter, they can either make changes or click submit if the details are correct

What if its an address field for the vendors and they live in the same place?
Add “As above” to the text box where the address is appearing What

Signer will see the “As above” when they click the text box and they can either make changes and click submit, or review and click submit

4. Click save
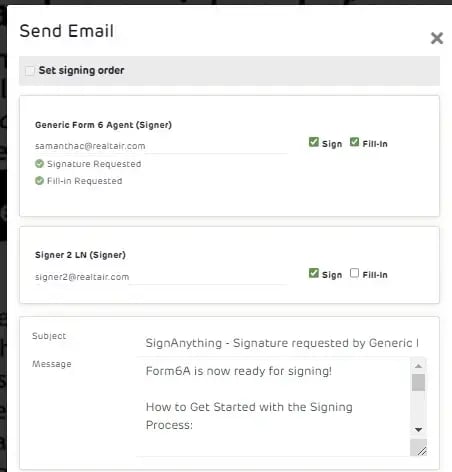
5. Select the signature icon to send the document for signing, and choose the recipient who will be responsible for filling in this information. Click here to learn how to send a doc for signing

Yes, and when you create your next SignAnything using the preset, the text box & request to fill in will be copied as well.
Click here to learn how to create a template for you & your team to use

2. I am an office admin, and we have SignAnything Presets that we have created - how would this work?
Yes, you can update an existing preset and clicking Update current preset

If you want the rest of the team to utilise the preset, please reach out to our support team at support@realtair.com to get it sorted.
3. How do signing order & filling in requests work?
-
The first signer must always be the one who completes the fill-in process.
-
Any other signer can’t have the same signing order as the signer who will complete the fill-in request.

Example: there are 3 signers in a document: Signer A, B, and C.
The request has been made for remote signing for all three signers, but only Signer A has been given the authority to fill in the details.
Hence, Signer A will be the first to receive an email containing a link to fill in the required information and proceed with the signing process. Once Signer A completes the fill-in process, the signature request will be sent to Signer B and Signer C to sign the document.
4. Can you nominate different signers to fill in different text boxes?
No, it is a current limitation, you cant nominate signer 1 to complete one custom text box, and signer 2 to complete the other text box
5. What does the signer see?
a. Receive an email from the agent requesting them to fill in and sign the doc

b. Signer click the “Review & sign now”
c. the document will open in a new tab

d. Click the text box to fill in the information, and click submit

e. Once you have filled in all the required fields, click finish on the top right hand corner
f. The PDF will be updated with the details, and you can start signing


g. Once complete - the signer (and if agent opt to send copies to other non signer) will receive a copy of the doc
.
![Realtair RGB Green Box Logo.jpg]](https://help.realtair.com/hs-fs/hubfs/Realtair%20RGB%20Green%20Box%20Logo.jpg?height=50&name=Realtair%20RGB%20Green%20Box%20Logo.jpg)